⚙️ Introduction
A branch in Git is a pointer to a specific point in the history of the project. This allows us to work on different parts of our project without affecting the main branch. And when we finished working on a branch, you can merge it back into the main branch.
The branch is an independent flow of Development.
If we create multiple files and commit them, then they are committed to the Master Branch.
Master Branch is the Default Branch in Git.
Generally, the project’s Source Code is placed on the Master Branch.
⚙️ Need Of Creating A Branch
Suppose, we are working on a project. And we’ll be going to create multiple files. All the files created will be on the Master Branch.

We created several files and made several Commits to develop a Web Application as per the Client’s requirement.

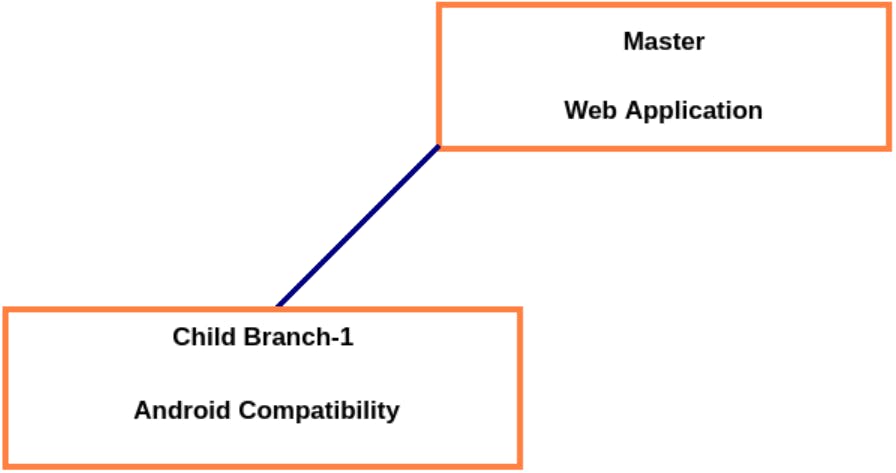
While working on the Master Branch to develop the web application, suddenly the client asks for Android compatibility also.
So, for that Android compatibility, we need to do some extra work.
And now we don’t want to mess up the new code (Android) with the previous code that we were working on for the web application. That work will continue as previously.
For the new feature (Android compatibility) whatever the client is expecting we’ll create a separate new Branch.
So, we’ll create a new Child branch “child branch-1”, and on that branch, we’ll be developing all the Android compatibility work.

So, now whatever will be our regular flow, won’t be affected because of the client’s new requirement.
If we want, we can commit and push the Source Code that is on the Master Branch to the Remote Repository without touching the Child Branch.
And we can push the Child Branch as a separate Branch to the Remote Repository.
Or we can merge the Child Branch with the Master Branch and then Commit the update to the Remote Repository.
Note: Master Branch is generally used for the main flow and Child Branch is for the new features.
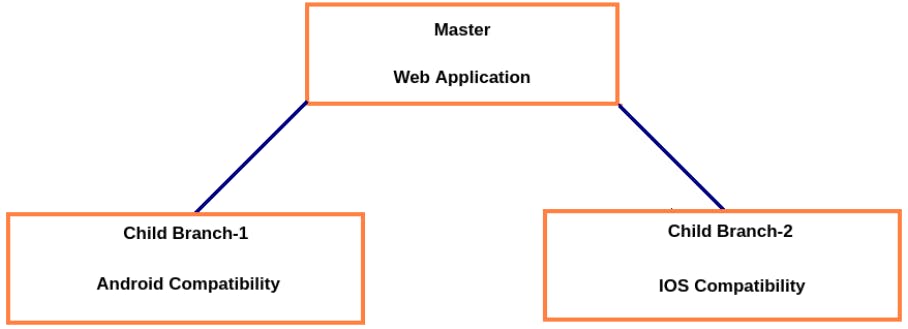
Suddenly the client asks for IOS compatibility also. So, we’ll create another Child Branch named “child branch-2”. And on that branch, we’ll be developing all the IOS compatibility work.

Note: Each Branch is Independent / Isolated from each other.
Now, we are having 3 Branches and all of them are Independent of each other.
There are a total of 3 flows of development. At any point in time, any flow can be committed to the Local Repository and we can push the changes to the Remote Repository. There is no dependency on other branches.
Note: Total things will be performed on the Master Branch unless and until we didn’t create a new Branch.
⚙️ Advantages Of Branching
Parallel Development: We can work on different parts of our project without affecting the main branch. This is especially useful if we are working on a large project with multiple people.
Organize Source Code in a clean separated way: We can create a branch to track a bug or issue. This allows us to work on the bug without affecting the rest of our project.
Work Independently i.e. Isolated from each other: We can test new features or changes without affecting the main branch. This is a great way to make sure that our changes work before you merge them into the main branch.
Q. Suppose we’ll have a separate workspace for the IOS Development, so how will it be different from the branch?
Ans: If we’ll maintain a separate workspace for the IOS Development then a separate Repository will be required. So, in future, if we have to merge the workspace with the main Workspace, then we are required to do it manually.
Space wastage won’t be there. And everything will be performed automatically by Git if we go for the separate Branch instead of a separate Workspace.
Note: All the files, commit whatever there are in the Master Branch by default will be available to the Child Branch. All the files, commits etc will be Inherited from the Parent Branch to the Child Branch.
Example:
If we create a Child Branch, from the Master Branch then all the files, commits etc. will be Inherited by the Child Branch. But after that, if we create more files on the Master Branch then it’ll not be going to reflect on the Child Branch.
Once we complete our work in the Child Branch then, we can merge that Child Branch to the Parent Branch and then we can Commit. Or we can push the changes on the Child Branch to the Remote Branch directly.
There are no restrictions for creating the number of Branches. We can create “n” branches.
⚙️ Various Commands Related To Branching
Here are some of the commonly used commands related to branching in Git:
🏷️ To View The Available Branches In The Repository
Syntax : git branch
Example:
If we will check the branches in the Workspace project1, then we’ll use the command git branch
It’ll show only one Branch (Master).

→ The symbol Star (*) indicates the current Active Branch. This means, currently on which Branch we are working.
🏷️ To Know Which Branch We Are Currently Working On
Syntax: git status
Example:
If we want to know which Branch we are currently working on, then we’ll check the status of the Git. It’ll tell the Branch Name. Try to use this after committing the files.

Note: To know on which Branch we are working then we can use either of the two commands:
git branch (* symbol will indicate the Active Branch).
git status
🏷️ To Create A New Branch
Syntax: git branch <branch name>
Example:
If we want to create a new branch “android” then we’ll use the command: git branch android
A new branch named “android” will be created.

To confirm that we can use the command git branch. It’ll display all the branches in that repository.

Now, there are two branches available in the Repository. And there is a star symbol (*) before the Master, which means the current Active Branch on which we are working is the Master Branch.
🏷️ Switching The Branches
Syntax: git checkout <Name of the branch on which you wanna switch>
Example:
If we want to switch from the Master Branch to the android Branch we’ll use the command git checkout android

It is telling “ Switched to branch 'android' ”. To confirm it, we can use the command git branch
Now the current Active Branch on which we are working is the android Branch as the star symbol (*) moves to before (in front of) the android branch.

We can use the command git status as well. It’ll be telling “On branch android”.

🏷️ Creating A Branch And Switch To That Branch
We can do it using 2 lines of commands. But we can do it using a single line of command.
Syntax: Git checkout -b <Branch name to be created>
Example:
If we have to create a new Branch ios and then switch to this branch from the other branch then we’ll use the command :git checkout -b ios

It is telling “ Switched to branch 'ios' ”. Now, To confirm it, we can use the command git branch
Now the current Active Branch on which we are working is the ios Branch as the star symbol (*) moves to before (in front of) the ios master.

We can use the command git status as well. It’ll be telling “On branch ios”.

🤝 Next Topic on Thursday !!!!!!!!!!!
👋👋👋👋
